Tuesday, May 28, 2013

A Wedding Croquembouche - Congrats Stephandy!

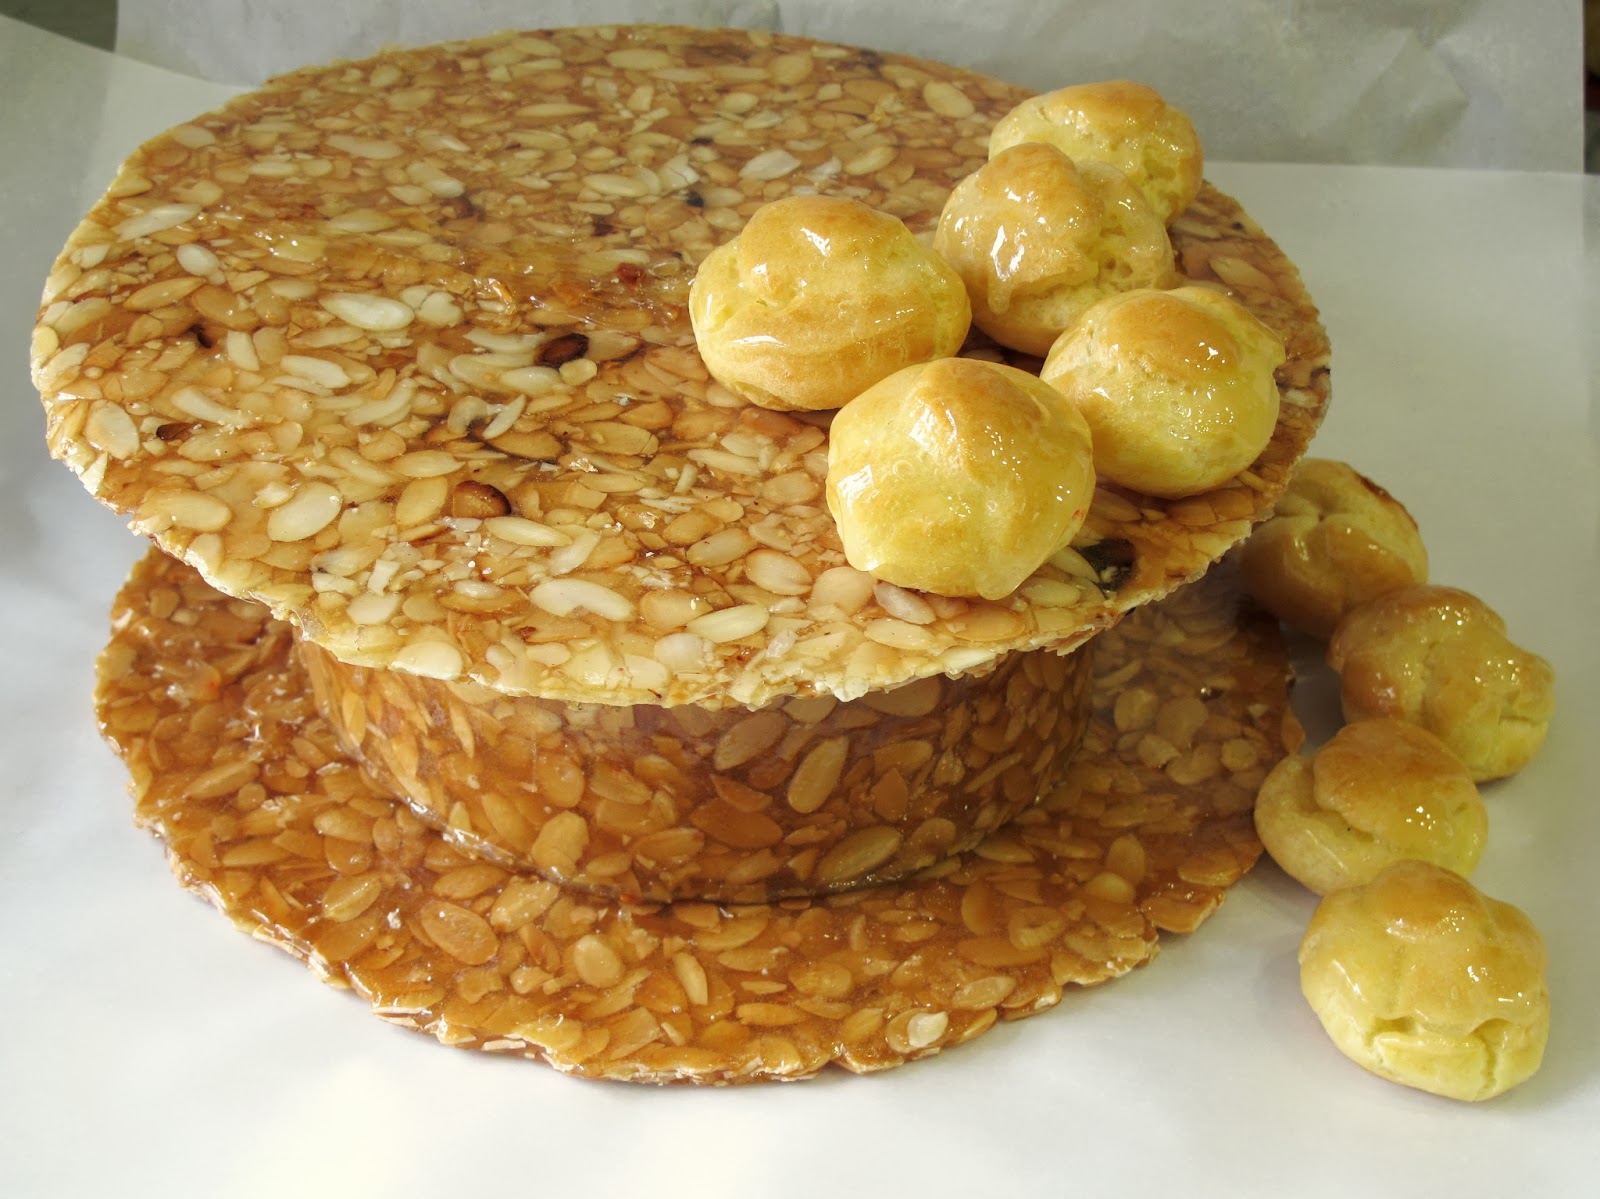
A croquembouche is a traditional French dessert found at celebrations such as weddings. The name of the dessert comes from the French words, croque en bouche, meaning 'crunch in the mouth'. The dessert is basically a conical tower of profiteroles (choux pastry filled with pastry cream or crème légère), held together by caramel. A traditional base for the presentation is nougatine (caramel and sliced almonds), and decorations can include caramel, sprinkles, ganache, flowers, and more.

When my friend Stephanie saw the photo of a croquembouche we made in class, she asked if I would make one for her wedding in April. I was honored, but intimidated! After some careful planning and a little bit of practice, I'm happy to share some photos of what I hope was a generally successful attempt. My only regret is that I made this purely for decorative purposes (in part because I don't have a commercial kitchen and in part because I had to do a red-eye drive to transport the components from NorCal to SoCal) and thus only filled the bottom two rows of cream puffs. Had I known there would be so much interest in actually eating this, and had I known that caramelized isomalt would hold up so effectively and not soften like caramelized granulated sugar often does, I might have been brave enough to fill every cream puff.

The base was the most challenging piece. After nougatine is cooked and poured, you literally have a matter of seconds or minutes to cut and shape (less when using isomalt as in my case). Once it hardens, it would have to be reheated in the oven to soften enough for molding. And unfortunately, the standard home oven is not large enough for a full sheet pan or the length of nougatine that is necessary to form the ring. Fortunately I stocked up on isomalt and almonds and got this right after a couple attempts. I also used nougatine for the decoration on top.
The flowers are a mix of hand-painted (but pre-made, store-bought) gumpaste flowers, and hand-made fondant-gumpaste roses and carnations. The color scheme for the wedding was pomegranate, citron and gold, which I think I captured in these flowers. I hope to learn how to make the wired gumpaste flowers from scratch in the near future, but given the limited time I had, these ones from Michael's worked well.

Isomalt does caramelize but does not darken in color as much as granulated sugar does. I liked the lighter, clearer color for coating the cream puffs and gluing the pieces together, as you can worry less about drips and uniformity (just don't eat too much of it). Isomalt is also more stable in that it absorbs less moisture and is less likely to get sticky and "melt" when sitting out. Adding a small amount of granulated sugar provides color (and control over the color). For the spun sugar, I used a greater amount of granulated sugar to get a more golden color.

This was a beast to make, but I am so glad I took on the challenge and was thrilled to share in the celebration of a beautiful young couple.

Sunday, December 23, 2012

Tortamisu and Vallarta Torte - Office Baby Shower


This is a very belated post, but a couple months ago, I made two cakes for an office baby shower! One with espresso for a pick-me-up, and one with tequila for a bit of relaxation. Neither of which were soaked enough to have any of those effects of course, but I was amused when someone pointed this out to me.
The first is a Tortamisu, from Extraordinary Desserts. According to  Extraordinary Desserts' website:

"Our unique version of Tiramisu consists of espresso soaked ricotta cake layers and Italian mascarpone rum cream. This house favorite is finished with whipped cream and dusted with cocoa."


I didn't have chocolate paillettes, so I simply coated the sides with toasted cake crumbs, and then chocolate jimmies. I would have preferred real chocolate, but the jimmies still did the trick, at least as far as texture goes. This cake was delicious and decadent but not too heavy or sweet.
 
The second is the Vallarta Torte, also from Extraordinary Desserts. I don't think this cake is currently available in store, so I don't have an official website description of it, but it is made of sponge cake layers soaked with a tequila simple syrup, and filled with layers of lime curd and lime curd pastry cream.
The outside is coated with lime curd whipped cream and toasted coconut chips. My execution of this cake wasn't stellar, but fortunately the whipped cream and coconut chips covered the imperfections! This cake was light and refreshing, and a great contrast to the Tortamisu.
Each of these cakes was quite an undertaking, and the two of them together resulted in a pretty late night, but I'm happy I was able to pull them off.

Saturday, November 3, 2012

Red Velvet Ginger Cream Cheese Cupcakes - An Improved Red Velvet Recipe

As I mentioned in my prior red velvet cupcake post, I hoped to come up with an oil-based recipe that I could recommend. With this recipe below -- mission accomplished!

From my experience, oil-based cakes, as compared to butter cakes, have a better texture and more moistness, at least for cupcakes. Butter cakes are a little denser (and drier?) and seem to work better for layered cakes.

This red velvet cake is topped with ginger-white pepper cream cheese, candied ginger and chocolate shavings. My mom had recently been to some fancy restaurant and was raving to me about a red velvet doughnut dessert she had eaten, with a ginger-pepper-chocolate cream cheese filling that had a kick to it. I took that as a challenge to come up with a cupcake version :)


Red Velvet Cake

Ingredients
Makes 22-24 cupcakes
  • 2 ½ cups flour
  • 1 ½ cups granulated sugar
  • 1 teaspoon baking soda
  • 1 teaspoon salt
  • 1 cup buttermilk
  • 1 ½ cups vegetable oil
  • 1 teaspoon white vinegar
  • 1 teaspoon vanilla extract
  • 2 large eggs
  • 2 tablespoons cocoa powder
  • 2 tablespoons red food coloring
Directions
  1. Adjust oven rack to middle position and heat oven to 350 degrees.
  2. Whisk flour, sugar, baking soda and salt in medium bowl. 
  3. Mix cocoa with food coloring in small bowl until smooth paste forms. 
  4. Mix buttermilk, oil, vinegar, vanilla and eggs in stand mixer.
  5. Add half of flour mixture and beat on medium-low speed until just incorporated, about 30 seconds. Add remainder of flour mixture, scraping down side of bowl.
  6. Add cocoa mixture and beat on medium speed until completely incorporated about 30 seconds. Use a rubber spatula to scrape sides and bottom of bowl to make sure red color is evenly distributed.
  7. Scoop into lined cupcake pans and bake until a toothpick inserted in center comes out clean, about 18-20 minutes.
Ginger Pepper Cream Cheese Frosting

Ingredients
Makes about 3 cups
  • ¾ cup unsalted butter, softened
  • 8 oz. (1 package) cream cheese, softened 
  • 2 teaspoon ground ginger (+/- to taste)
  • 1 teaspoon white pepper (+/- to taste)
  • 1 teaspoon vanilla extract
  • 3 cups powdered sugar (+/- to taste)
Directions
  1. Beat butter and cream cheese until smooth.
  2. Add sugar one cup at a time and beat on low speed until incorporated.
  3. Add vanilla, ginger and pepper and increase speed until frosting is fluffy. Note: the amount of spices noted above results in a mild kick. Add more for stronger flavor, or mix in a ginger syrup or chopped crystallized/candied ginger.

Sunday, October 14, 2012

Milo | Portrait of a Gentleman

Better known as Mr. Milo when on Google campuses, Milo dons a purple bowtie while on east campus:
and a red bowtie while on west campus:
 
I think my pup is kind of handsome. Excuse me while I have a proud parent moment :)

Sunday, October 7, 2012

Lemon Red Velvet Cupcakes - Red & Gold

It's homecoming weekend! For a reunion potluck with my syzsters, I made these red velvet cupcakes, filled with lemon curd and topped with lemon cream cheese frosting and a gumpaste yellow rose, as a nod to our sorority colors of red and gold.

I've actually never made red velvet cupcakes before, so I decided to try out two recipes, one from Cook's Illustrated (which I can almost always count on), and one from the Hummingbird Bakery Cookbook (via Joy the Baker). Neither blew me away, as I thought both were slightly dry and not particularly flavorful on their own. Although both held up well and tasted great once assembled with the frosting and curd, I think a good cake should stand on its own.
Cook's Illustrated on left; Hummingbird Bakery on right 
Initially, out of the oven, I liked the Hummingbird recipe better, because it used more cocoa and food coloring, resulting in a deeper red color and a stronger chocolate flavor. But once the cupcakes were assembled and sat overnight, I thought the Cook's Illustrated recipe was more balanced. The Hummingbird recipe had a little too much cocoa, such that the cake tasted more like a chocolate cake (which, unless you are mixing in melted chocolate into the recipe, often has a slightly bitter aftertaste), and was overpowering the lemon and cream cheese flavors.

In the future, I hope to tinker with a oil-based recipe, rather than a butter-based one, as I generally prefer the texture and moistness of oil cakes (at least for cupcakes). Will update if I succeed there!

Cook's Illustrated Red Velvet Cake - from Holiday Baking 2010

Ingredients
Makes 20 cupcakes

  • 2 ¼ cups flour
  • 1 ½ teaspoons baking soda
  • ¼ teaspoon salt
  • 1 cup buttermilk
  • 1 tablespoon white vinegar
  • 1 teaspoon vanilla extract
  • 2 large eggs
  • 2 tablespoons cocoa powder (regular, not Dutch-processed, for proper rise and color)
  • 2 tablespoons red food coloring
  • ¾ cup (1 ½ sticks) unsalted butter, room temperature
  • 1 ½ cups granulated sugar
Directions
  1. Adjust oven rack to middle position and heat oven to 350 degrees.
  2. Whisk flour, baking soda and salt in medium bowl. 
  3. Whisk buttermilk, vinegar, vanilla and eggs in large measuring cup. 
  4. Mix cocoa with food coloring in small bowl until smooth paste forms. 
  5. With stand mixer on medium-high speed, beat butter and sugar together until fluffy, about 2 minutes, scraping down bowl as necessary. 
  6. Add one-third of flour mixture and beat on medium-low speed until just incorporated, about 30 seconds. 
  7. Add half of buttermilk mixture and beat on low speed until combined, about 30 seconds. 
  8. Scrape down bowl as necessary and repeat with half of remaining flour mixture, remaining buttermilk mixture, and finally remaining flour mixture. 
  9. Scrape down bowl, add cocoa mixture and beat on medium speed until completely incorporated about 30 seconds. Using rubber spatula give batter final stir. (Note: make sure the red color is consistent throughout batter, especially at bottom of bowl.)
  10. Scrape into lined cupcake pans and bake until a toothpick inserted in center comes out clean, about 20 minutes. 
adapted from Hummingbird Bakery Cookbook Red Velvet Cupcake - via Joy the Baker

Ingredients
Makes 20 cupcakes

  • ½ cup (1 stick) unsalted butter, room temperature 
  • 1 ½ cup granulated sugar
  • 2 eggs
  • 5 tablespoons unsweetened cocoa powder
  • 6 tablespoons red food coloring 
  • 1 teaspoon vanilla extract 
  • 1 cup buttermilk
  • 2 ¼ cups flour 
  • 1 teaspoon salt 
  • 1 teaspoon baking soda 
  • 1 tablespoon white vinegar
Directions
  1. Adjust oven rack to middle position and heat oven to 350 degrees.
  2. Preheat oven to 350 degrees.
  3. On medium-high speed, cream the butter and sugar until light and fluffy, about 3 minutes. 
  4. Turn the mixer to high and add the egg. Scrape down the bowl and beat until well incorporated.
  5. In a separate small bowl, mix together the cocoa powder, vanilla extract and red food coloring to make a thick paste. Add to the batter and mix on medium speed until completely combined.
  6. Reduce the mixer speed to low and slowly add half of the buttermilk. Add half of the flour and mix until combined. Scrape the bowl and repeat the process with the remaining milk and flour. Beat on high until smooth.
  7. Again, reduce the mixer speed to low and add the salt, baking soda and vinegar. Turn to high and beat for another couple of minutes until completely combined and smooth.
  8. Divide the batter evenly between the cupcake liners and bake for about 20 minutes, or until a toothpick inserted into the center comes out clean.
For the lemon cream cheese frosting, beat together 1 cup (2 sticks) unsalted butter, 12 oz. cream cheese, 1 lb. (4 cups) confectioners' sugar, ¾ teaspoon vanilla extract, and the juice from one lemon (to taste, about 2-3 tablespoons). Note: the acidity from the lemon juice may slightly break up the consistency of the frosting, so don't make this too far in advance.

For the lemon curd, combine 2 whole eggs, 8 egg yolks, 1 cup sugar, and ⅔ cup lemon juice in a heatproof bowl set over a saucepan of simmer water. Cook and whisk constantly until the mixture is thick enough to coat the back of a spoon. Remove from heat and add 2 tablespoons unsalted butter, whisking until smooth. Strain the mixture through a sieve into a small bowl to remove lumps. Cover with plastic wrap, pressing the wrap against the surface to prevent a skin from forming. Refrigerate until chilled and firm, at least 2 hours (or up to 2 days).

Tuesday, October 2, 2012

Chocolate Bourbon Tart

 Chocolate bourbon tart (with a slight emphasis on the bourbon . . . )


I love the crust on this. It has the crunchy yet crumbly texture and taste of a chocolate shortbread, which contrasts well with the rich bittersweet chocolate bourbon filling. It's like eating an adult fudgy brownie with a cookie crust.

This recipe is contributed by Michael Glissman to the Food & Wine Annual Cookbook 2011 (which, by the way, has not let me down yet). I believe the original publication is from Italian Lunch in a Sonoma Vineyard with Jamey Whetstone and Michael Chiarello, and Food & Wine first published this in its monthly in October 2010.

Ingredients
Pastry
  • 1 ½ cups flour
  • ½ cup unsweetened cocoa powder
  • ¼ teaspoon salt
  • 1 cup (2 sticks) unsalted butter, room temperature
  • ½ cup sugar
  • ½ teaspoon vanilla extract
Filling
  • 12 oz. bittersweet chocolate
  • ¼ teaspoon salt
  • ½ cup bourbon (if you're not a fan of the taste, dilute this a little)
  • 1 cup sugar
  • 1 cup (2 sticks) unsalted butter, room temperature
  • 5 large eggs, room temperature
 Directions
  1. In a small bowl, sift the flour with the cocoa powder and salt. In a standing mixer fitted with the paddle attachment, beat the butter with the sugar at medium-high speed until it is well blended. Beat in the dry ingredients at low speed until just combined. Add the vanilla extract and beat just until a soft dough forms, about 5 seconds. Press the pastry into a disk, wrap in plastic and refrigerate until the dough is firm, about 1 hour.
  2. Preheat the oven to 350°. On a floured work surface, working quickly, roll out the pastry to an 11-inch round, about 1/4 inch thick. Transfer the pastry to a 10-inch fluted tart pan with a removable bottom. Gently press the pastry over the bottom and up the side of the pan. Trim off any excess pastry. Refrigerate the shell for about 20 minutes, until firm.
  3. Line the pastry with foil and fill with pie weights or dried beans. Bake for about 30 minutes, until almost cooked. Remove the tart shell from the oven and let cool for 15 minutes, then gently remove the foil and weights. Return the shell to the oven and bake for about 12 minutes longer, until dry. Transfer to a wire rack and let the tart shell cool to room temperature. Just before filling, refrigerate the tart shell for a few minutes until slightly chilled.
  4. Put the chocolate and salt in the bowl of the standing mixer fitted with the whisk attachment. In a small saucepan, heat the bourbon with the sugar over moderate heat, stirring a few times, just until the sugar is dissolved; try not to let the bourbon boil. Pour the warm bourbon mixture over the chocolate. Add the pieces of butter and the eggs and beat at moderate speed until the mixture is creamy and shiny.
  5. Set the tart shell on a large baking sheet and pour in the filling. Bake for 35 to 40 minutes, until the filling has risen and the top is cracked in places. Transfer the tart to a rack and let it cool completely. Unmold the tart and refrigerate it overnight. Using a sharp knife, cut the tart into thin wedges and serve. 

Friday, September 14, 2012

Apricot Chocolate Oatmeal Cookies

This is a great companion cookie for the Oatmeal Craisin White Chocolate Cookie, and uses a similar recipe, with dried apricots replacing the craisins, and semi-sweet chocolate (chips, and exterior dipping) replacing the white chocolate. The original recipe from Food & Wine uses much higher butter/sugar to flour/oatmeal ratio than the craisin recipe, which makes the cookie spread and get a bit thing. I've adapted it to be somewhat closer to the craisin recipe.
Adapted from Food & Wine Annual Cookbook 2011:

Ingredients
  • 2 cups old-fashioned oats
  • 1 ½ cups flour
  • ¾ cup butter, softened
  • 1 cup brown sugar
  • 2 large eggs
  • 1 teaspoon baking soda
  • ½ teaspoon salt
  • 1 teaspoon vanilla extract
  • 1 cup pecans
  • 1 cup dried apricots, cut into ¼-inch dice
  • 1 cup semi-sweet chocolate chips
Directions
  1. Preheat oven to 350ºF. 
  2. Bake the pecans until lightly toasted (about 8 minutes). Once cooled, chop coarsely.
  3. Mix the oats, flour, baking soda and salt in a small bowl.
  4. Using a mixer, beat the butter and sugar until light and fluffy. Add the eggs and vanilla and beat until blended. Beat in the dry mixture until just incorporated. 
  5. Fold in the dried apricots, toasted pecans and chocolate chips.
  6. Drop by rounded tablespoons onto lined cookie sheets (parchment paper or nonstick foil), spaced at least 1-2 inches apart. Bake for about 16 minutes until lightly browned. Let cool and transfer to wire rack.
  7. Drizzle with or dip in melted semi-sweet chocolate. 
These cookies will expand more than the craisins recipe.